Path Constraints
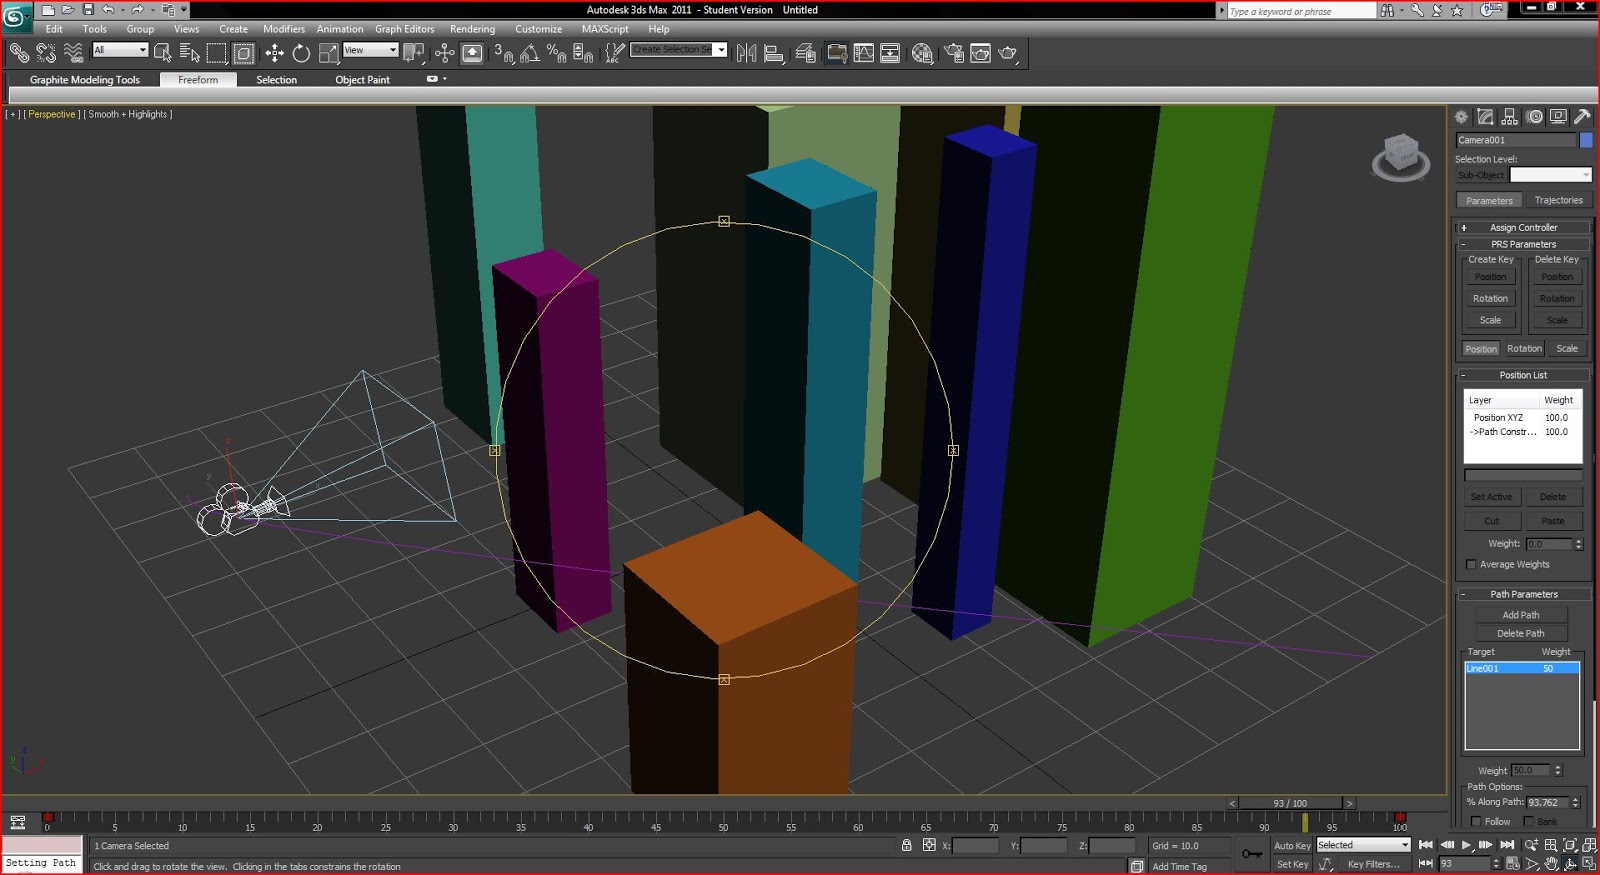
For this class tutorial we recapped on path constraints, to give and object a path to follow whether it's a camera or a shape. I began by creating some boxes for my path to go through and drew a line through the middle then raised the z axis.
I then a added a free camera to the line by selecting the camera and clicking on animation > constraints > path constraints. I've used this technique before and i'm confident in using it but it was good for the group to recap.
A target camera could also be placed in the scene and replace the free camera, i could then add a shape to the line using constraint path and adding the target of the camera the shape for it to follow.
This techniquie is very useful and will be used in my animation scenes.
Thursday, 13 December 2012
P40 Warhark - Second Model
P40 Warhawk
This model was alot faster to make as i learnt from my mistakes in the first model, and not having to work from a turbosmooth saves alot of time.
My second model is a P40 warhawk, i used the same modelling techniques as i did in my first model by setting up the reference planes and working from a plane.
This model was alot faster to make as i learnt from my mistakes in the first model, and not having to work from a turbosmooth saves alot of time.
Week 5 - Continuation of group project
This week in class we had a group meeting to discuss where each of us where with our models, my first plane is now finished and we also have a boat and a hospital.
Owen is still making the environment, which concerns the group as it needs to be the first model that is complete so we can add all our models to it for animating.
A6M Zero - First Model
Modelling Continued
Now that the materials have been added i need to add wheels and propellars, here are the steps i took to achieve this.
Firstly i made a plane and rotated it so i was flat against the side reference plane i then followed the reference plane to make the metal casing for the wheel. I then used a soft selection on the bottom to make a curve. To make the wheel and hydraulics i used cylinders, and changed the scaled of them til i was happy with them. I then added a materials and mirrored the element onto the other side.
To make the propellers i used a cylinder changed it to an editable poly, i then selected all the vertices at one end and scaled them down to form a point, i did the same to the other end and flattened the cylinder slightly and added a turbosmooth to make a blade, and rotated it into position on the nose cone. I repeated the process for the other two blades to make the propellers.
Making the Bomb
This was the easiest and quickest part of the model as i just used a sphere and selected either end of the poly and dragged it out for from a long tube. I then selected the vertices on one end and scaled down to make a point.
I then added materials to the shape and attached it to the bottom of the under carriage.
Final Plane Renders
Now that the materials have been added i need to add wheels and propellars, here are the steps i took to achieve this.
Firstly i made a plane and rotated it so i was flat against the side reference plane i then followed the reference plane to make the metal casing for the wheel. I then used a soft selection on the bottom to make a curve. To make the wheel and hydraulics i used cylinders, and changed the scaled of them til i was happy with them. I then added a materials and mirrored the element onto the other side.
To make the propellers i used a cylinder changed it to an editable poly, i then selected all the vertices at one end and scaled them down to form a point, i did the same to the other end and flattened the cylinder slightly and added a turbosmooth to make a blade, and rotated it into position on the nose cone. I repeated the process for the other two blades to make the propellers.
To finish i copied the wheel and hydraulics from the front, grouped them and scaled it down to make the rear wheel. I then grouped the entire plane and tilted it to make it sit on the wheels.
Making the Bomb
This was the easiest and quickest part of the model as i just used a sphere and selected either end of the poly and dragged it out for from a long tube. I then selected the vertices on one end and scaled down to make a point.
I then added materials to the shape and attached it to the bottom of the under carriage.
Final Plane Renders
Presentation
This week we also had our presentation, even though it went well i feel we could have been better prepared with our storyboard as i was very impressed with some of the other groups work. We did however prepare necessary slides, and each took a speaking role to present what our group intentions were for the animation and what we hope to achieve over the next few weeks.
week 4 - Class Tutorials
Particle Systems
Smoke Tutorial
For this tutorial we learnt how to use particle systems, i've tried to use particle systems in the past but couldn't get it to work, so hopefully after todays tutorial i'l understand the technique alot better. This technique will become very useful for when we want to make our pearl harbour attack scenes and have some boats smoking as there sinking.
I began by using the superspray which is under particle systems in the drop down menu, i then selected hose from the preset menu and pressed play to show the particles flowing up.
I then increased the particle quanity to 40 and changed the the viewport display from ticks to mesh, i also changed the particle size from 1 to 7. By changing the emit start to -30 the particles start before the first frame, then by changing the emit stop to 130, this means that the particles will flow to capacity til the end of the frame, then changing the particle type to 'facing'.
Now that the smoke is made, a material needs to be added. Firstly i opened up the material editor and clicked 'maps' and 'diffuse colour' and added particle age to it. I then change the top colour to white, the middle to an off white and the bottom to a light grey, this give the colour of the smoke.
After choosing the colours i went back to maps in the material editor and selected opacity and added a 'mask' to it. I then added noise to the map channel, and a gradient to the mask channel and added the material to selection then rendered.
The smoke effect came out well and would add the sense of realism to our animation although i might reduce to the amount of particles to save render time
Fire Tutorial
Another use for the super spray is to make fire, this tutorial we were shown a way or creating realistic fire to use in our animations.There's alot of step to get to the final fire effect but it's worth it.
Firstly i selected superspray and placed it on the work area, i then went to the superspray settings and changed the spread to '15' under the basic parameters, and selecting mesh. I then changed the percentage of the particles to 100%, the speed to 0.2, and the 'use total' to 200.
The particle timing is important for fire as i want the flames to stay constantly burning, therefore i changed the emit start to -100, the emit stop to 500, the display til 500 and the fade to 30, and changed the particles to facing. We now need to give the particle rotation to make it look more like fire. Under the Rotation settings i changed the spin time to 1, the variation to 0.5, the phase to 180, the variation to 1 and ticked face map.
Now that the setting for the particles are correct i can add a material.
I opened the material editor and added noise to the diffuse channel, and changed the colours to yellow and a dark orange. I then ticked fractual and added a gradient to the opacity channel, and ticked radial. I then added a face map to the material which adds the material to each particle.
By then changing the noise to 0.7, the size to 5 and the noise threshold to 0.5 and 0.5 the fire was made
We will hopefully be using fire in our animation, but due to time constraints and whether we have the models made in time would reflect heavily on render time.
Smoke Tutorial
For this tutorial we learnt how to use particle systems, i've tried to use particle systems in the past but couldn't get it to work, so hopefully after todays tutorial i'l understand the technique alot better. This technique will become very useful for when we want to make our pearl harbour attack scenes and have some boats smoking as there sinking.
I began by using the superspray which is under particle systems in the drop down menu, i then selected hose from the preset menu and pressed play to show the particles flowing up.
I then increased the particle quanity to 40 and changed the the viewport display from ticks to mesh, i also changed the particle size from 1 to 7. By changing the emit start to -30 the particles start before the first frame, then by changing the emit stop to 130, this means that the particles will flow to capacity til the end of the frame, then changing the particle type to 'facing'.
Now that the smoke is made, a material needs to be added. Firstly i opened up the material editor and clicked 'maps' and 'diffuse colour' and added particle age to it. I then change the top colour to white, the middle to an off white and the bottom to a light grey, this give the colour of the smoke.
After choosing the colours i went back to maps in the material editor and selected opacity and added a 'mask' to it. I then added noise to the map channel, and a gradient to the mask channel and added the material to selection then rendered.
The smoke effect came out well and would add the sense of realism to our animation although i might reduce to the amount of particles to save render time
Fire Tutorial
Another use for the super spray is to make fire, this tutorial we were shown a way or creating realistic fire to use in our animations.There's alot of step to get to the final fire effect but it's worth it.
Firstly i selected superspray and placed it on the work area, i then went to the superspray settings and changed the spread to '15' under the basic parameters, and selecting mesh. I then changed the percentage of the particles to 100%, the speed to 0.2, and the 'use total' to 200.
The particle timing is important for fire as i want the flames to stay constantly burning, therefore i changed the emit start to -100, the emit stop to 500, the display til 500 and the fade to 30, and changed the particles to facing. We now need to give the particle rotation to make it look more like fire. Under the Rotation settings i changed the spin time to 1, the variation to 0.5, the phase to 180, the variation to 1 and ticked face map.
Now that the setting for the particles are correct i can add a material.
I opened the material editor and added noise to the diffuse channel, and changed the colours to yellow and a dark orange. I then ticked fractual and added a gradient to the opacity channel, and ticked radial. I then added a face map to the material which adds the material to each particle.
By then changing the noise to 0.7, the size to 5 and the noise threshold to 0.5 and 0.5 the fire was made
We will hopefully be using fire in our animation, but due to time constraints and whether we have the models made in time would reflect heavily on render time.
A6M Zero - First Model
Modelling Continued
This week i've carried on with my A6M model and used the mirror tool to firstly see what my plane will eventually look like before adding materials, and i am pleased with the result.
Adding the cockpit
This was the most trickiest part of the model, and i had to use several modelling techniques to get it just how i wanted it to look,
I firstly highlighted the lines around the edge of the cockpit and dragged them up and fitted the first set of vertices against the reference planes. i repeated the process until the curve meeted the reference plane. Now that the shape of the cockpit is correct i can begin to add detail to the windows. I changed the model so that it was see through. and selected a horizontal edge and using the ring and connect tool to make another edge which i can move to fit inline with the windows.
I then repeated the process across the cockpit making sure all the edges were in line with the reference planes. Once this was complete i selected a face and used inset to make the edge of the window, by then selecting the inner face i extruded the poly inwards to form a window, and repeated the process across the cockpit using the same inset size and extrude for every window.
I then added smoothing groups to the entire plane to give it more detail and make it look as if the wing are attached to the plane
My plane model is now complete and i can now mirror and target weld the vertices. To achieve this i firstly selected all the polygons using element. I then used the mirror tool and selected 'y' axis and clone. I then dragged the mirrored model to the other side and moved the blueprints back off the work area. I now needed to attach the new model to the existing model so that both vertices appear when selected. I selected one half of the model then selected attach and click on the other half, 3ds max now sees this as one element. To attach the vertices together i selected the two opposite vertices and selected weld and changed the amount to '2' so that the two vertices meet in the middle. I then repeated the process all round the plane, to create the model plane.
Adding Materials
Now that the model is complete i need to add materials to make the plane look more realistic, using the pictures i researched in the first week i can add various colour materials to the plane.
I used a army green colour on the plane and changed the specular level to 30 to make it look more like a metal texture, i tried using the uvw unwrap technique that we learnt in class but the material kept stretching, possibly because of the way i modelled the plane. I then added a white texture to the bottom of the plane, with a specular level of 30. Now that the base colours are on i just need to add the detail materials.
These include the front yellow stripes on each side of the wings, and the black line detailing, the metal panels, and making the nose cone a darker green.
To make the black lines i used the ring and connect tool to make small lines all over the plane, and selected the polys and changed the material to black. This was a long winded process but i think the it was worth it.
The last step i needed to do was to add a glass material to the windows, i looked up the tutorial for glass on my blog for last year and followed the steps. but i added more of a reflection as there will be nothing in the cockpit.
This week i've carried on with my A6M model and used the mirror tool to firstly see what my plane will eventually look like before adding materials, and i am pleased with the result.
Adding the cockpit
This was the most trickiest part of the model, and i had to use several modelling techniques to get it just how i wanted it to look,
I firstly highlighted the lines around the edge of the cockpit and dragged them up and fitted the first set of vertices against the reference planes. i repeated the process until the curve meeted the reference plane. Now that the shape of the cockpit is correct i can begin to add detail to the windows. I changed the model so that it was see through. and selected a horizontal edge and using the ring and connect tool to make another edge which i can move to fit inline with the windows.
I then repeated the process across the cockpit making sure all the edges were in line with the reference planes. Once this was complete i selected a face and used inset to make the edge of the window, by then selecting the inner face i extruded the poly inwards to form a window, and repeated the process across the cockpit using the same inset size and extrude for every window.
I then added smoothing groups to the entire plane to give it more detail and make it look as if the wing are attached to the plane
My plane model is now complete and i can now mirror and target weld the vertices. To achieve this i firstly selected all the polygons using element. I then used the mirror tool and selected 'y' axis and clone. I then dragged the mirrored model to the other side and moved the blueprints back off the work area. I now needed to attach the new model to the existing model so that both vertices appear when selected. I selected one half of the model then selected attach and click on the other half, 3ds max now sees this as one element. To attach the vertices together i selected the two opposite vertices and selected weld and changed the amount to '2' so that the two vertices meet in the middle. I then repeated the process all round the plane, to create the model plane.
Adding Materials
Now that the model is complete i need to add materials to make the plane look more realistic, using the pictures i researched in the first week i can add various colour materials to the plane.
I used a army green colour on the plane and changed the specular level to 30 to make it look more like a metal texture, i tried using the uvw unwrap technique that we learnt in class but the material kept stretching, possibly because of the way i modelled the plane. I then added a white texture to the bottom of the plane, with a specular level of 30. Now that the base colours are on i just need to add the detail materials.
These include the front yellow stripes on each side of the wings, and the black line detailing, the metal panels, and making the nose cone a darker green.
To make the black lines i used the ring and connect tool to make small lines all over the plane, and selected the polys and changed the material to black. This was a long winded process but i think the it was worth it.
The last step i needed to do was to add a glass material to the windows, i looked up the tutorial for glass on my blog for last year and followed the steps. but i added more of a reflection as there will be nothing in the cockpit.
Subscribe to:
Posts (Atom)


